In my quest to write up my LambdaConf talk about documentation, I thought it would help to do a deep dive on some of the tools that help Haskellerz to document their code and add that bling-bling to their libraries. Documentation is super important when attracting users to your library. If you don't believe me then maybe you should come to my talk in June, hopefully I can convince you then :)
In this post I'm going to go through how to use Haddock to maximise your Haskell documentation. Haddock is ubiquitous when documenting Haskell. When you go to Hoogle to search you favourite text library all the documentation there is generated by Haddock. It's a markup language that the author writes which is embedded in the Haskell comments. This means that you can have your documentation right beside your function and your pretty documentation in HTML. Since I mentioned HTML, I might as well also mention that you can hyperlink your code! When you mention types or functions in your documentation you can link them to the definition and see their documentation too. You can surf your own library which is pretty gnarly dude!
In this post I'll take you through getting set up with Stack, go through the two markup identifiers to get you started pimping your docs and then I'll run through some extra markup to really get your documentation looking the way it deserves to look.
Stack, Stack, Stack 'em up!
Apologies to non-Stack users up front. I'm primarily a Stack user so it's what I'm most familiar with but the Haddock documentation is quite excellent and I'll provide a link at the end.
To run Haddock on your package it's as simple as running:
stack haddock <my-super-cool-package>Which is just an alias for:
stack build --haddock <my-super-cool-package>And when you're not sure what arguments you want to supply you can run:
stack haddock --helpAnd that's pretty much it. Simple eh?
90% of what you want
There's two siblings in our Haddock markup and they are -- | and -- ^. You will see these very often and get you 90% of the way when documenting your Haskell code. Let's just run through what these bad boys can do.
Tip-Top Level Functions
The first obvious one is to document all your lovely top level functions. We use the -- | markup syntax when we are referring to the thing below.
-- | The 'capitalise' function capitalises on your losses.
--   But it also capitalises a word.
capitalise :: String -> String
capitalise []       = []
capitalise (c : cs) = toUpper c : cs
And we use -- ^ when we want to refer to thing above (hey look at that it's an arrow pointing up)
capitalise :: String -> String
-- ^ The 'capitalise' function capitalises on your losses.
--   But it also capitalises a word.
capitalise []       = []
capitalise (c : cs) = toUpper c : cs
And this what they look like when I run the Haddock command:


We'll quickly note that I wrote 'capitalise'. This creates that hyperlink you can see in the documentation to capitalise but more on this later.
Oh and if you prefer using multiline commenting Haddock has got you covered because it's cool like that:
Classifying what your Typeclasses do
We can also document our Typeclasses' functions. Really they don't differ at all from how our top level functions were documented.
Simply using -- | above the functions in the typeclass we get the same effect. And let's take a look at what our output is:

Sum-times we document and this is the Product of our Work
We've covered functions, we've covered Typeclasses that pretty much just leaves us with Sums and Products, and guess what we're going to use? Yup, -- | and -- ^! So let's just look at what these look like. We've got our good friend pipey:
and our other good friend carat pointer:
This is what they look like when rendered:

I'd argue documenting inputs is useful
Finally, one of our friends will also help us document individual arguments and our guy is -- ^, like so:
toMeToYou :: Who a b -- ^ It's just 'Me'
-> Who a b -- ^ It's just 'You'
-> BothOfUs a b -- ^ But now we're having fun together as 'BothOfUs'
toMeToYou me you = BothOfUs me youWhich looks like:

You're going to run into issues due to parsing if you try to do:
On your Markups, Get Set, Document!
Alright, we've got our building block of documenting functions, Typeclasses, Sums, etc. Now we want to pimp out what we're writing with some good ol' Haddock markup. So let's check out what we have in our Haddock toolbox.
Paragraphs
When you want to distinguish a paragraph all you need to do is separate the sections with one or more lines. Let's update the previous capitalise documentation by adding a paragraph with a note:
-- | The 'capitalise' function capitalises on your losses.
-- But it also capitalises a word.
--
-- Note: That this function assumes the first argument is
-- a single word!
capitalise :: String -> String
capitalise []       = []
capitalise (c : cs) = toUpper c : cs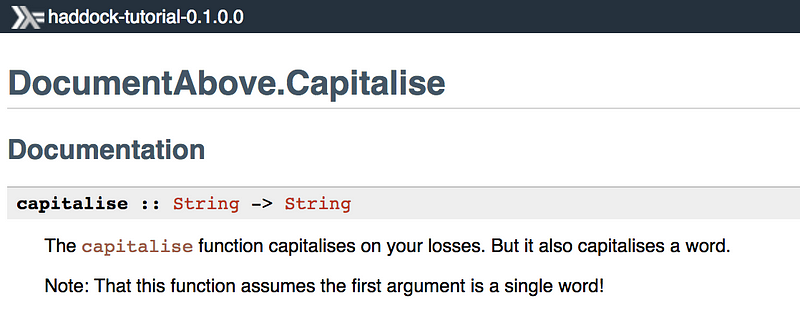
Codeblocks
When we want to write code blocks into our documentation we have two options. We can use > (often called "bird tracks" but they look more like beaks to me) for a single line of code, or @ ... @ (and since we're on a roll of mnemonics we can call these "crazy eyes") for multiple lines. Let's see our new friends in action!
-- | The 'capitalise' function capitalises on your losses.
--   But it also capitalises a word.
--
--   Note: That this function assumes the first argument is
--   a single word!
--
-- @
-- capitalise \"hello\" == \"Hello\"
-- @
--
-- > capitalise "world" == "World"
capitalise :: String -> String
capitalise []       = []
capitalise (c : cs) = toUpper c : cs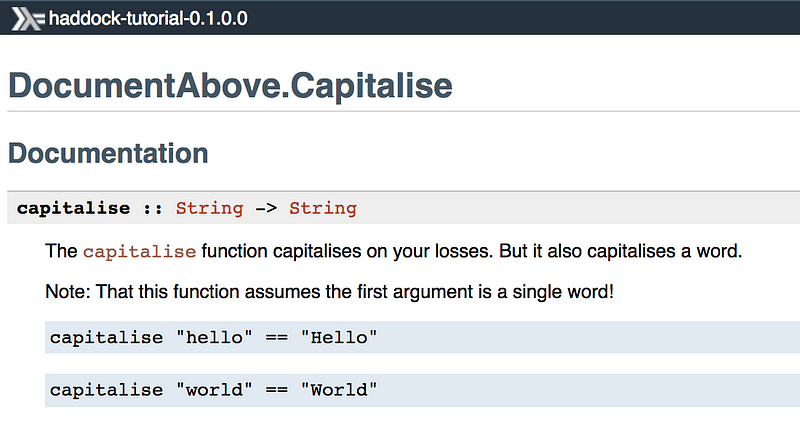
Something I noticed when rendering these was that I had to escape " when I was using crazy eyes, otherwise it would think Hello was a module. This wasn't necessary when using bird tracks.
Examples
Good documentation will have lots of examples of use of your super cool code. To achieve this with Haddock we can use >>> (or beak-beak-beak) followed by one or more lines. Let's add an example to capitalise:
-- | The 'capitalise' function capitalises on your losses.
--   But it also capitalises a word.
--
--   Note: That this function assumes the first argument is
--   a single word!
--
-- @
-- capitalise \"hello\" == \"Hello\"
-- @
--
-- > capitalise "world" == "World"
--
-- >>> capitalise "fintan"
-- "Fintan"
capitalise :: String -> String
capitalise []       = []
capitalise (c : cs) = toUpper c : cs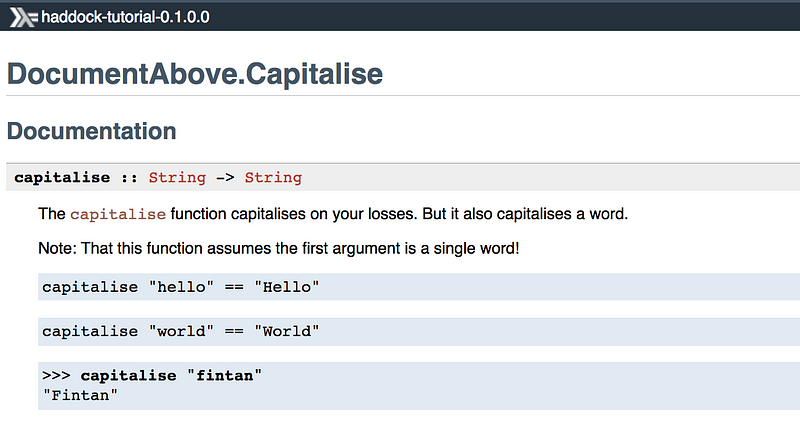
Properties
You can also write properties for your functions using prop> and this allows you to test properties via doctest and doctest-discover. Capitalising on this feature, let's check out what it looks like:
-- | The 'capitalise' function capitalises on your losses.
--   But it also capitalises a word.
--
--   Note: That this function assumes the first argument is
--   a single word!
--
-- @
-- capitalise \"hello\" == \"Hello\"
-- @
--
-- > capitalise "world" == "World"
--
-- >>> capitalise "fintan"
-- "Fintan"
--
-- Preserves the length of the input
--
-- prop> length xs = length (capitalise xs)
capitalise :: String -> String
capitalise []       = []
capitalise (c : cs) = toUpper c : cs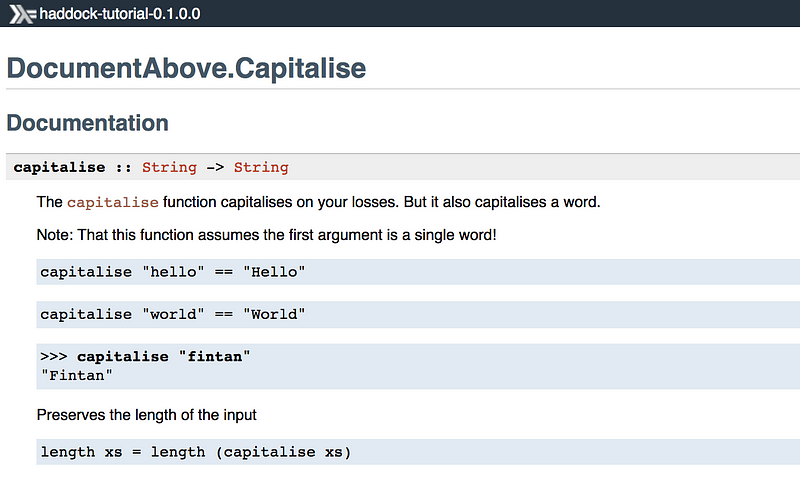
Hyperlinking
We can hyperlink everything related to code --- functions, types, typeclasses and modules. Modules are done by using double quotes, " and everything else via single quotes '. The great thing is that we don't have to escape these characters when using them in scenarios that aren't related to code. Haddock is smart enough to check that they are surrounding valid Haskell identifiers when trying to hyperlink them. Another handy feature is that Haddock won't hyperlink anything that is not scope, unless you're linking modules. For example, if we import Text qualified under the alias T i.e. import qualified Data.Text as T, we can see there is a rendering difference between doing 'Text' and 'T.Text'. The latter gets a hyperlink and the former is merely rendered as monospaced font. Here is an example of linking functions, types and modules:
-- | 'capitalise' specialised to 'T.Text' using the 'first' function from "Data.Bifunctor".
capitaliseT :: T.Text -> T.Text
capitaliseT = maybe T.empty (uncurry T.cons . first toUpper) . T.uncons
Grab bag of Markup
For the rest of the markdown I'm going to just list them out with a quick explanation. More like a cheatsheet.
- Emphasis is rendered by surrounding text like
/this is serious guys!/. Other mark up is valid in emphasis quotes. - Bold is rendered by surrounding text like
__that's a bold move__. Again, other mark up is valid inside quotes. - Monospaced text is rendered by surrounding text like
@Ok Computer@. - Itemized lists are done by using
*or-. We can nest paragraphs in lists and the rule for doing a sublist is a newline and 4 space indentation. - Enumerated lists are by using
(n)orn.. - Definition lists are done by doing the following
@foo@: The description of foo.. - We can link URLs by using angle brackets
<http://mycoolwebsite.io>. - Hyperlink text by doing
[check out my cool website!](http://mycoolwebsite.io). - You can embed images using
. - LaTeX can rendered using
\[...\]for displayed mathematics and\(...\)for in-line mathematics. - Headings are conjured using
=, for example= My Heading Level 1and== My sub heading at level 2. These go up to 6 levels of headings. - And the very useful
@sinceto mark which version a function was introduced.
This is where I'll leave you. You're now dangerous enough to write documentation for your code and have it rendered to HTML. There is more to go over in Haddock such as module descriptions and exports but I'll leave that for another post. If you're curious (and as promised) here is the link to the Haddock documentation.
On top of this I have kept a repo to mess around with the rendering and take all those lovely screenshots from above. You can find it here.
Shout outs
Thanks to Greg Pfeil for pointing out that I mixed up the escaping between crazy eyes and bird tracks. Cheers to my dude Sandy Maguire for pointing out doctest.

